![GSI_A7[1]-1-1](https://www.getgsi.com/hs-fs/hubfs/GSI_A7%5B1%5D-1-1.png?width=125&height=56&name=GSI_A7%5B1%5D-1-1.png)
NetSuite Feature: Balancing Segments and Journals
In NetSuite, accounting entries are always balanced for the company (subsidiary). For each entry, debits equal credits. Some organizations also need to balance entries for other dimensions or categories, such as funds or business units. This requirement is common for non-profit organizations, advertising, media, and publishing firms.
The Balancing Segments feature lets you use custom segments to balance accounting entries by other dimensions automatically.
Balancing Segments Definitions
The following terms appear often in documentation for balancing segments and journals:
- Segment– A custom classification field used to classify records, similar to class, department, and location. You can define possible values for each segment and add the segments to specific record types.
- Balancing segment– a segment within which you can balance debits and credits. Examples of balancing segments that you might create include business units, product lines, or funds.
- Header segment value– A value within the segment that you select in the transaction header.
- Column or Line segment value– The value or values within the segment that you select in transaction lines.
- Intersegment account– A general ledger account used as a clearing account to balance transactions by segment.
For transactions balanced by segment, the header segment value is a debit or credit that balances with the column or line segment values’ debits and credits.
Balancing Segments Enhancements
NetSuite 2020.2 includes the following enhancements to Balancing Segments:
- All balancing segments preferences and setup processes are now on the Balancing Segments subtab in Setup > Accounting > Preferences > Accounting Preferences. You can now select which custom segments are balancing segments in this subtab, and the Balancing checkbox on custom segment forms has been removed. The Balancing Segments subtab now also includes the following:
- A General group which includes all general preferences for the Balancing Segments feature
- A Default Accounts group which includes fields to select Intersegment Due To, Due From, and Cash accounts
- Fields from which to select accounts to use with specific transaction types
- A new Payments Use Transaction Line Segmentationpreference adjusts payments using balancing journals and an intersegment cash account.
- When you run the balancing by segments process, NetSuite creates balancing journal lines which use the cash adjustment account or accounts to break down the payment by the line segments on the paid transaction.
- To use this feature, enable the Payments Use Transaction Line Segmentation preference in the Balancing Segments subtab in Accounting Preferences.
- The new InterSegment Elimination feature reverses autobalancing lines posted by balancing journals when using different InterSegment Due To and Due From accounts.
- When you enable the feature, you create an elimination segment that NetSuite uses to reverse any autobalancing lines.
- To enable this feature, check the new Enable InterSegment Elimination box in the Balancing Segments subtab in Accounting Preferences.
- A new Update the Balancing Journal on Process Re-Run preference updates balancing journals when the process is re-run instead of deleting them and creating new balancing journals.
Balancing Segments Preferences
When the Balancing Segments feature is enabled, the Accounting Preferences page includes a Balancing Segments subtab with the following:
- A Generalgroup which includes all general preferences for the Balancing Segments feature:
- Payments Use Transaction Line Segmentation— For more information, see Transaction Line Segmentation on Payment Transactions.
- Enable Intersegment Elimination— For more information, see Reversing Balancing Segment Intersegment Lines.
- Update the Balancing Journal on Process Re-Run– When you check this box, NetSuite updates balancing journals when the balancing by segments process is re-run. When you clear this box, NetSuite deletes the journals in the period being balanced and creates new balancing journals to replace them.
- A Default Accountsgroup which includes fields to select Intersegment Due To, Due From, and Cash accounts:
- Segmentssubtab
- In the Balancing Segment field, select an existing custom segment to use as a balancing segment. The custom segment must be GL impacting. For more information, see Creating a Balancing Segment.
- If you are using the Enable Intersegment Elimination preference, select an Elimination Value within the segment which NetSuite will use to reverse any auto-balancing lines. For more information, see Reversing Balancing Segment Intersegment Lines.
- Accountssubtab
- Select transaction posting, due to, due from, and cash accounts for specific transaction types.
Enabling the Balancing Segments Feature
To enable features in NetSuite, you must have the Administrator role or another role that includes the Enable Features permission.
To enable the Balancing Segments feature:
- Go to Setup > Company > Setup Tasks > Enable Features and click the Accounting
- In the Advanced Features section, check the Balancing Segments
You must also enable the Custom Segments feature. A message prompts you to enable Custom Segments if it is not already enabled.
- Click Save.
After you enable the feature, your account includes two new permissions: Balancing Journals and Balance Transactions by Segments. For more information, see Roles and Permissions for Balancing Segments.
Creating a Balancing Segment
After you have enabled the Balancing Segment feature, you can create a balancing segment from a new or existing custom segment.
Balancing segments must have general ledger impact. You can have only two active balancing segments at one time. For instructions to make balancing segments inactive or to delete them, see Inactivating a Custom Segment or Deleting a Custom Segment Definition.
You need the Balancing Journals permission with access at the Create level to make a custom segment a balancing segment. You also need the Custom Segments permission at Edit level or higher
After you create a balancing segment, you cannot clear the GL Impact box for the custom segment. For details about GL impact for custom segments, see Configuring GL Impact for a Custom Segment.
Note To create a balancing segment, follow the general instructions in Creating a Custom Segment. Those instructions include a description of all fields in the custom segment. The following procedure includes the fields that are required for balancing segments.
To create a balancing segment:
- Go to Customization > Lists, Records, & Fields > Custom Segments.
- Click New Custom Segment.
- Keep the Typefield set to its default value of List/Record.
Balancing segments must have GL impact, and custom segments with GL impact must be of the List/Record type.
- Check the GL Impact This box must be checked for balancing segments. For more details about GL impact, see Configure a Segment to Appear on the GL Impact Page.
- Enter additional configuration settings on the following subtabs:
- Values– Create values for the balancing segment by adding lines to the sublist. These values are the options that are available in the balancing segment list on transaction records. For details about each column in the Values sublist, see Creating Values Within the Segment Definition.
- Application & Sourcing– This subtab does not relate specifically to balancing segments. For information, see Applying a Custom Segment to Record Types and Dynamic Default Value Sourcing for Custom Segments.
- Validation & Defaulting– This subtab does not relate specifically to balancing segments. For information, see Making a Custom Segment Mandatory and Configuring Static Defaults for Custom Segments.
- Permissions– Complete this subtab as follows:
- Add the roles that can run the balancing by segments process to the sublist.
- Set the Record Access Levelto Edit for each role.
- Set the Search/Reporting Access Levelto a value other than the default.
- Dependent Segments– This subtab does not relate specifically to balancing segments.
- Display Order– This subtab does not relate specifically to balancing segments. For details see Setting Display Order of All Custom Segments.
- Translation– This subtab does not relate specifically to balancing segments. This subtab shows only when the Multi-Language feature is enabled
- 4.Click Save
- 5.Go to Setup > Accounting > Preferences > Accounting Preferences and click the Balancing Segments subtab
- 6.In the Segments list, click Add Row.
- Select the custom segment you created or want to use as a balancing segment.
- (Optional) If you use the Enable Intersegment Elimination preference, select an elimination value to use with this custom segment. NetSuite uses this balancing segment value to reverse auto-balancing lines posted by balancing journals in your intersegment accounts. For more information, see Reversing Balancing Segment Intersegment Lines.
- Click OK, then Save.
Upon save, NetSuite creates the balancing segment and an associated custom record type. The custom record type has the same name as the balancing segment and is available on the Custom Record Types list page. You can edit the custom record type directly to add values to the custom segment.
Configuring Intersegment Accounts
Intersegment accounts enable you to balance by segment without changing the general ledger impact to your regular transaction posting accounts. When balancing journals are generated, NetSuite posts the offsetting debits and credits to these intersegment accounts. You must configure your intersegment accounts to complete the feature setup.
Create your intersegment accounts before you begin this procedure. For instructions, see Creating Accounts. You can use accounts of any of the following account types for intersegment accounts:
- Accounts Payable
- Accounts Receivable
- Bank
- Long Term Liability
- Other Asset
- Other Current Asset
- Other Current Liability
Select your default intersegment accounts on the Balancing Segments subtab of the Accounting Preferences page. Your role must include the Accounting Preferences permission.
To configure intersegment accounts:
- Go to Setup > Accounting > Preferences > Accounting Preferences.
- Click the Balancing Segments
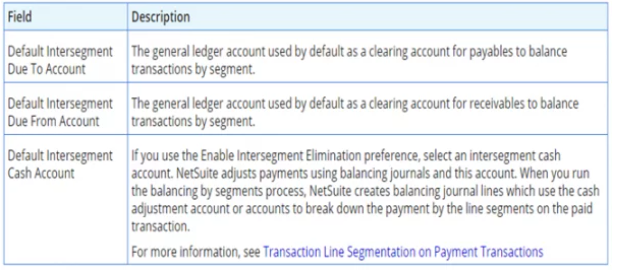
- In the Accounts section, select values for the following fields:
- Default Intersegment Due To Account
- Default Intersegment Due From Account
- Default Intersegment Cash Account(see Transaction Line Segmentation on Payment Transactions)
You can use different accounts for the Default Intersegment Due To and Default Intersegment Due From accounts. If you prefer, you can use the same account for both.
Tip: If you use the same account for both Default Intersegment Due To and Default Intersegment Due From accounts, the consolidated balancing lines automatically zero out in the general ledger. You can also zero these lines out using the Default Intersegment Cash Account. For more information, see Reversing Balancing Segment Intersegment Lines.
Reversing Balancing Segment Intersegment Lines
You can select different InterSegment Due To and Due From accounts when you set up the balancing by segments process. If you do, your Balance Sheet Total Assets and Total Liabilities & Net Assets may appear to increase. This is because the balancing process produces adjustment transactions in both intersegment accounts, and these will not offset each other within their respective accounts. There are two solutions to prevent this situation:
- Select the same account for both the Intersegment Due To and Intersegment Due From accounts. When set up this way, the adjustment transactions automatically balance, as one balancing transaction is a debit, and one is its corresponding credit.
- Use different Intersegment Due To and Due From accounts and use the Enable Intersegment Elimination preference.
If you use the Enable Intersegment Elimination preference, NetSuite will automatically balance the adjustment transactions in the Intersegment Due To and Due From accounts in an Elimination value (for example, a fund for intersegment elimination) which you create and select.
Tip If you plan to use this preference, you should create a value within your balancing segments which will be used only for this purpose.
To set up intersegment elimination:
- Go to Setup > Accounting > Preferences > Accounting Preferences and click the Balancing Segments subtab.
- Check the Enable Intersegment Elimination
- In the Segments subtab, select an Elimination Value for each balancing segment.
Note: When the Enable Intersegment Elimination box is checked, you must select an elimination value for your balancing segments. You can change the elimination value to another one later if needed.
When you run the balancing by segments process, NetSuite will create intersegment elimination transactions in this fund. These elimination transactions balance the Intersegment transactions created in your due to and due from accounts. Your consolidated statements will then display the correct consolidated figures
Note: Intersegment elimination only affects intersegment lines which NetSuite creates for balancing by segments, and not any manually created lines. You must manually balance any of these postings.
If GSI can help with any of your NetSuite needs, please visit NetSuite Services.